
Xbox One/Series Sonus Toolkit
Initial flash, I2C flash, and custom sound editing for Xbox One/Series with ISD9160 chip.
Xbox One and Series consoles can play custom startup/notification sounds through a dedicated audio chip (ISD9160) and inbuilt speaker. This tool walks you through replacing those sounds - entirely in your browser, with no software to install. It talks to your console through a small USB adapter (a Raspberry Pi Pico) and only touches that one audio chip.
What you'll need
- A Raspberry Pi Pico or Pico 2 board (~$5), plus a few jumper wires.
- The Chrome or Edge browser (this uses a browser feature - WebUSB - that Firefox and Safari don't support).
- Basic soldering, to wire the Pico to your console. Xbox One PHAT and Special Edition consoles already have the audio chip fitted, so that's all you'll need - other consoles need the more involved DIY mod to solder the chip on first (the guide below tells you which case you're in).
How it works, roughly
- Pick your console model - the app shows you the exact wiring for it.
- Wire up the Pico to your console - or, if the audio chip isn't fitted yet, do the DIY mod to solder it on first.
- Use the app to program the chip over the Pico (a couple of guided steps).
- Load your own sound into the app's editor and send it to the console.
Each step is guided on-screen with connect buttons and status messages, so you don't need to know the technical details to follow along - just follow the wizard in order.
The steps above aren't a fixed 1-2-3-4 sequence — which ones you need, and in what order, depends on your console and chip. Follow the Guide for the right path; jump to any step directly once you know what you need.
Which console are you working with?
Compatibility and wiring differ per console revision — pick yours to get the right diagram and firmware.
Special Edition
The ISD9160 is already fitted and has firmware on it - no soldering needed.
Regular
Needs the DIY mod (solder the ISD9160 on) and an initial SWD flash, since it's a fresh/blank chip.
Console guide
No console selected yet - pick yours first so this guide can show the right wiring diagram, BOM, and firmware.
What you'll need
- A Raspberry Pi Pico (or Pico 2) - used as the SWD probe and I2C adapter
- Basic soldering skills
⚠ Direct motherboard (FACET) connection required
- Do not connect 3V3 power
- Do not press the power button
- Solder a 300 Ω resistor between SMC_RST (Pin 1) and GND
- Console needs standby power (PSU connected, not powered on)
- Desolder all connections after dumping/flashing
See the FACET hardware documentation for details.
Soldering & wiring reference
This edition needs the DIY mod - solder the ISD9160 and supporting passive components on, then cut the SWDIO/SWCLK bridge trace so it can be programmed via SWD (it's a fresh/blank chip with no firmware yet).
Additional requirements for the DIY mod
- Advanced soldering skills - the ISD9160 is a fine-pitch QFP48 package
- ISD9160 IC, speaker, and the supporting passive components listed below
| Reference | Qty | Package | Value | Type | Note |
|---|
Source: DuRFUnitI2C's DIY Special Edition guide (board photos, speaker bracket STL models, and any updates).
| Connector | 3V3 | GND | SDA (DATA) | SCL (CLOCK) | Notes |
|---|
| Pico pin | Signal |
|---|---|
| 3V3 | 3V3 |
| GND (any) | GND |
| GP0 (pin 1) | SDA (DATA) |
| GP1 (pin 2) | SCL (CLOCK) |
Initial SWD Flash
Only needed for a fresh/blank ISD9160. Uses a Raspberry Pi Pico running CMSIS-DAP v2 (yapicoprobe) firmware, talking SWD directly from the browser via WebUSB - no OpenOCD. The device picker below only ever shows a Pico already running that firmware - if it's empty, use the Switch Pico Firmware step first.
Switch Pico Firmware
The same Pico is reused for both roles (SWD probe and I2C adapter) — switch it to whichever one you need next. Same steps either direction:
- Hold the BOOTSEL button on the Pico while plugging it into USB - it enters the ROM bootloader.
- Click Connect BOOTSEL device below and pick it from the browser's device chooser.
- Choose which firmware to flash, then click Erase & Flash.
Connect with RP2040 on Windows fails?
This is a known WebUSB/RP2040 issue on Windows (see piersfinlayson/picoflash#1). In BOOTSEL mode the Pico exposes two USB interfaces: Interface 0 is the RPI-RP2 mass-storage drive used for drag-and-drop flashing, and Interface 1 is the vendor-specific PICOBOOT interface the browser's WebUSB API needs in order to talk to the device for this page's own Connect BOOTSEL device button. Windows has no built-in driver for Interface 1, so it has to be bound to the generic WinUSB driver before WebUSB can use it — normally that happens automatically, but on some Windows setups it silently fails and Connect just hangs with no error. Two ways around it:
Option A — flash manually, no driver required: hold BOOTSEL while plugging the Pico in, then drag the matching firmware file below onto the RPI-RP2 drive that appears in File Explorer. This only touches Interface 0 (plain USB mass storage), which Windows already knows how to handle.
- I2C adapter firmware — Raspberry Pi Pico (RP2040) / Raspberry Pi Pico 2 (RP2350)
- CMSIS-DAP probe firmware — Raspberry Pi Pico (RP2040) / Raspberry Pi Pico 2 (RP2350)
Option B — bind WinUSB to Interface 1 with Zadig, if you'd rather use this page's own
Connect & Flash flow instead of drag-and-drop (this is also the fix
Raspberry Pi's own docs
give for picotool hitting the same driver gap):
- With the Pico still in BOOTSEL mode, download and run Zadig (portable, no install needed).
- In Zadig, open Options → List All Devices — the Pico won't appear in the dropdown otherwise.
-
From the dropdown, select
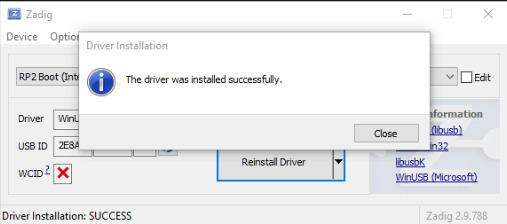
RP2 Boot (Interface 1). Double-check that exact "(Interface 1)" suffix — Zadig also lists the mass-storage interface here, and installing WinUSB onto the wrong one can break drag-and-drop flashing instead. - Confirm the driver box on the right reads WinUSB, then click Install Driver (shown as Replace Driver if a driver's already bound) and wait — it can take a minute or two.
- Unplug and replug the Pico (holding BOOTSEL again), then retry Connect BOOTSEL device above.
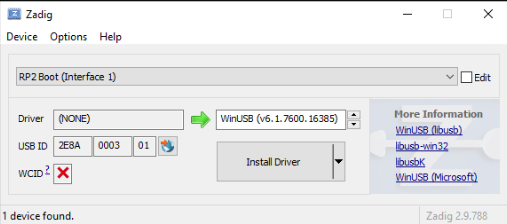
RP2 Boot (Interface 1) selected, WinUSB targeted — click Install Driver.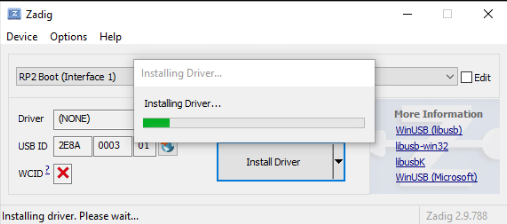
I2C Flash
Talks the RF Unit's proprietary I2C bootloader protocol directly via the Pico's I2C-adapter firmware. The device picker below only ever shows a Pico already running that firmware - if it's empty, use the Switch Pico Firmware step first.
| Mode | - |
|---|---|
| Firmware version | - |
| VPE version | - |
Play a sound
Custom Sound Editor
Inject or delete segments from an existing ISD9160 firmware. Make sure to use a firmware dump from a matching console model. Workflow:
- Load an existing base firmware dump (.bin) below — its metadata is read immediately.
- Click Load segments to list its audio segments; extract any segment as a WAV to save it, or replace/stub segments to prepare your edits.
- Once you've queued at least one replacement, set a version string and click Build Patched Firmware to download the patched image.
| Version | - |
|---|---|
| Segments | - |
| Checksum | - |
| Size | - |
| Audio space used |
-
|
| Seg | Codec | Size | Details | Preview | Action |
|---|